
Growing up, those thin, salty potato chips in the blue bag felt like a secret treat—something special and a little rebellious. Making baked potato chips at home feels like reclaiming that joy but with a healthier twist and more control over the seasoning. It’s surprisingly simple, and honestly, kind of addictive to watch raw slices turn crispy in the oven.
This recipe is about more than just crunch; it’s about the process, the aroma that fills the kitchen as the chips bake, and the little moments of pride when you get that perfect golden edge. Plus, customizing flavors makes it a fun, almost meditative task—an antidote to the often over-processed snack aisle options.
Focusing on the nostalgic comfort of childhood snacks, this recipe elevates baked potato chips by emphasizing homemade crispness and a customizable seasoning blend, transforming a simple snack into a thoughtful kitchen project.
The story behind this recipe
- I stumbled upon this idea one quiet afternoon, trying to replicate that perfect crunch of store-bought chips without all the oil and preservatives. It was a mishmash of kitchen experiments that surprisingly worked—thin slices, a hot oven, and a sprinkle of salt. That moment I realized baking could actually produce that satisfying snap I craved, with less guilt.
- Ever since, I’ve kept tweaking the process—adjusting thickness, seasoning, and baking time—trying to get closer to that ideal crispness. It’s become a little ritual, a way to enjoy a nostalgic snack with a personal touch. Plus, the smell of baking potatoes turning crispy is a reminder that simple ingredients can make something truly addictive.
- heading: The story behind this recipe
Key ingredients and tips
- Russet potatoes: I like how their starchy flesh crisps up beautifully—use a mandoline for even, paper-thin slices; thinner slices turn crunchier, so don’t skip that step.
- Olive oil: Just a light spray coats the chips evenly, giving them a subtle fruitiness and helping them crisp; skip if you want a completely oil-free version, but they won’t be quite as crispy.
- Sea salt: I love a good flaky salt for that salty crunch and a burst of flavor; you can swap with kosher salt, but you might need a bit more for the same punch.
- Seasoning blends: Paprika, garlic powder, or even a pinch of cayenne—feel free to customize; just sprinkle lightly before baking so the flavors don’t burn.
- Vinegar (optional): A splash of apple cider vinegar adds a tangy brightness after baking; skip if you prefer a purer potato flavor or want a milder finish.
- Optional herbs: Dried rosemary or thyme—sprinkle on top before baking for an herby aroma; fresh herbs might burn in the oven, so add those after if you want that fresh punch.
Spotlight on Key Ingredients
Russet potatoes:
- I love how their starchy flesh crisps up beautifully—use a mandoline for even, paper-thin slices; thinner slices turn crunchier, so you don’t want them too thick.
- Olive oil: Just a light spray coats the chips evenly, giving them a subtle fruitiness and helping them crisp; skip if you want a completely oil-free version, but they won’t be quite as crispy.
- Sea salt: I love a good flaky salt for that salty crunch and a burst of flavor; you can swap with kosher salt, but you might need a bit more for the same punch.
Sea salt:
- It’s the finishing touch that brings everything together, adding that perfect burst of salty flavor with a slight crunch.
- Seasoning blends: Paprika, garlic powder, or even a pinch of cayenne—feel free to experiment; sprinkle lightly so flavors don’t burn during baking.
- Vinegar (optional): A splash of apple cider vinegar adds a bright tang after baking; skip if you prefer a purer potato flavor or a milder finish.
Notes for ingredient swaps
- Dairy-Free: Use a light mist of olive oil instead of butter or dairy-based sprays. The flavor remains clean and the crisps stay crispy.
- Vegan: Swap traditional olive oil with avocado oil or coconut oil for a subtle different aroma without sacrificing crispness.
- Low-Sodium: Reduce salt to half or use a potassium-based salt substitute. Keep in mind, flavor will be milder but still satisfying.
- Herb Variations: Fresh herbs like thyme or rosemary can replace dried versions, but add after baking to prevent burning and preserve aroma.
- Spice Level: Substitute cayenne with smoked paprika or chipotle powder for a smoky kick that complements the potato flavor.
- Sweet Twist: For a sweeter chip, sprinkle with cinnamon and a touch of sugar after baking, but don’t bake too long or they’ll burn.
- Oil Choices: If you want a less oily chip, skip the spray and toss slices lightly in oil, but expect slightly less crispness.
Equipment & Tools
- Mandoline: For uniformly thin slices, ensuring even baking.
- Baking sheet with parchment: Prevents sticking and makes cleanup easier.
- Spray bottle: To lightly coat slices with oil without excess.
- Tongs or spatula: To flip chips halfway through baking for crispness.
Step-by-step guide to baked chips
- Equipment & Tools: Gather a mandoline for even slices, a baking sheet with parchment paper, a sharp knife, and a spray bottle for oil.
- Wash and peel potatoes. Use mandoline to slice as thin as possible, about 1mm (0.04 inch). Aim for uniform thickness to ensure even crisping.
- Rinse slices in cold water to remove excess starch. Pat dry thoroughly with a clean towel or paper towels. Moisture is the enemy of crispness.
- Preheat oven to 200°C (390°F). Line the baking sheet with parchment for easy cleanup and even baking.
- Arrange potato slices in a single layer on the sheet, leaving space between each. Lightly spray with olive oil, just enough to coat thinly, about 2-3 sprays per layer.
- Sprinkle with sea salt and any desired seasonings (paprika, garlic powder). Be sparing; flavors intensify during baking.
- Bake for 15-20 minutes. Check at 15 minutes; the edges should turn golden. If they’re still pale, continue baking up to 5 more minutes.
- For even crispness, flip chips halfway through baking. Use tongs or a spatula to turn them gently.
- Watch for color and smell. Chips should be crispy and smell toasted, not burnt. If edges darken too fast, lower oven temp slightly.
- Remove from oven and let sit for 5 minutes on the sheet. They’ll crisp further as they cool. Do not cover; steam softens chips.
- Transfer to a wire rack or plate. Serve immediately for best crunch, or store in an airtight container once cooled.
Let the chips sit on the rack for 5 minutes to fully crisp. Serve immediately or store in an airtight container once cooled. For extra crunch, reheat in a 180°C (350°F) oven for 3-5 minutes.
How to Know It’s Done
- Color: Edges should be deep golden, not burnt.
- Texture: Chips should snap when broken, not bend or feel greasy.
- Aroma: A toasted potato smell indicates proper doneness.
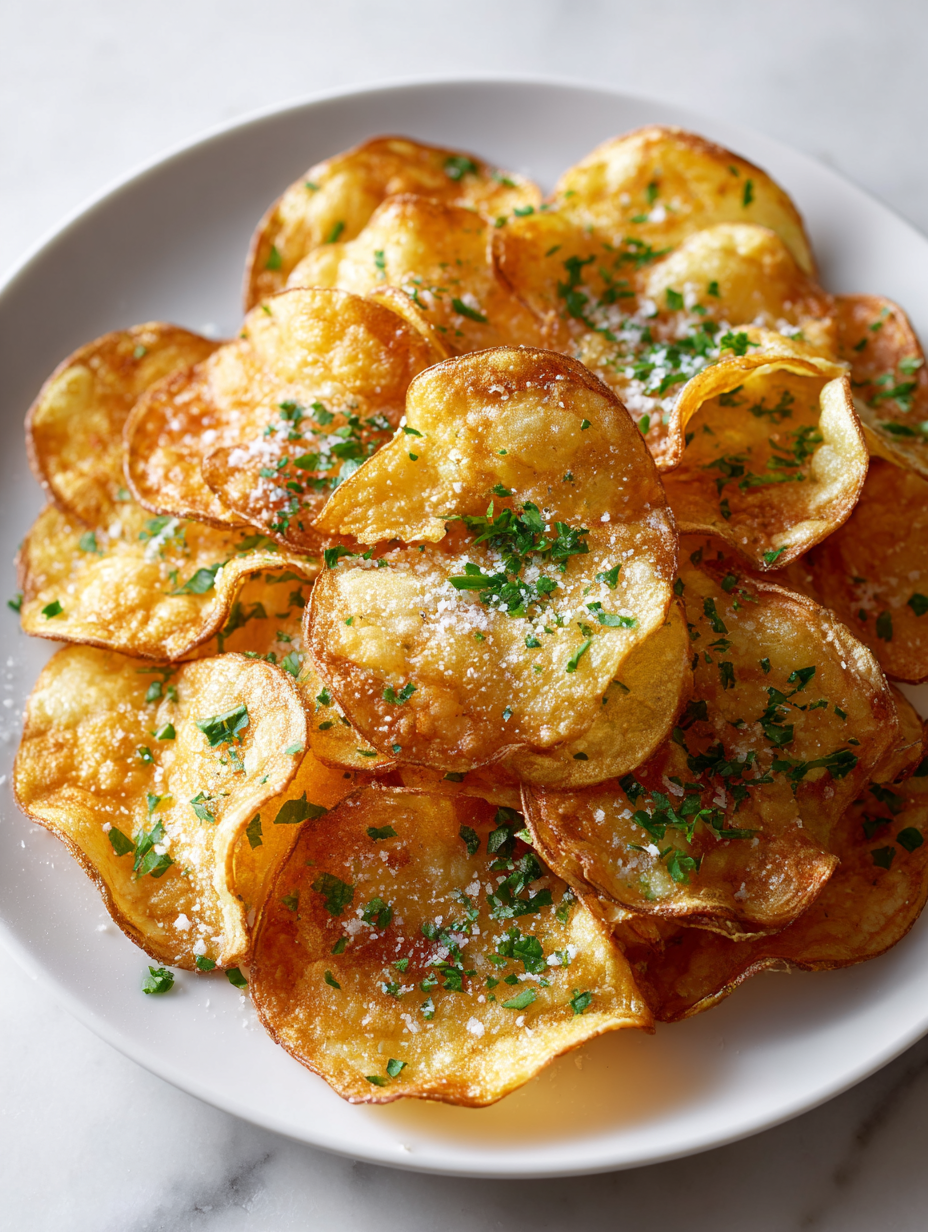
Homemade Baked Potato Chips
Ingredients
Equipment
Method
- Set the oven to 200°C (390°F) and line a baking sheet with parchment paper.
- Use a mandoline to slice the potatoes as thinly and evenly as possible, about 1mm thick. Rinse the slices in cold water to remove excess starch, then pat them dry thoroughly with a towel or paper towels. This step helps achieve maximum crispness.
- Arrange the dried potato slices in a single layer on the prepared baking sheet, leaving some space between each to allow for even baking.
- Lightly spray the potato slices with olive oil using a spray bottle, aiming for a thin, even coating. This helps them crisp up without becoming greasy.
- Sprinkle sea salt and paprika over the slices to your taste, ensuring even coverage for flavor.
- Bake the chips for about 15-20 minutes, flipping them halfway through using tongs or a spatula. Watch carefully near the end—edges should turn deep golden brown and smell toasted.
- Remove the chips from the oven once they’re crisp and golden around the edges. Let them cool on the baking sheet for 5 minutes to firm up further.
- Transfer the cooled chips to a wire rack or plate. Serve immediately for the best crunch, or store in an airtight container once completely cooled.
Notes
Pro tips for perfect baked chips
- Boldly thin: Use a mandoline for even, ultra-thin slices that turn crispy and light.
- Spray sparingly: A quick, even mist of oil helps chips crisp without greasiness.
- Watch color: Remove chips when edges are deep golden, not burnt, for perfect crunch.
- Flip halfway: Turn chips at the 10-minute mark for uniform crispness and color.
- Dry thoroughly: Pat slices completely dry before baking to prevent sogginess.
- Cool on rack: Let chips sit on a wire rack after baking to maximize crispness.
- Season fresh: Add herbs or spices after baking to preserve aroma and avoid burning.
Common mistakes and how to fix them
- FORGOT to dry potato slices thoroughly → They won’t crisp if damp.
- DUMPED too much oil → Use a light spray for even, crisp results.
- OVER-TORCHED chips → Remove from oven once edges are golden, not dark brown.
- MISSED flipping halfway → Flip chips at 10 minutes for even crispness.
Quick fixes and pantry swaps
- When chips are soggy, splash with a little more oil and bake a few extra minutes.
- If slices stick together, patch with a gentle tap and separate them before baking.
- DUMPED too much salt? Rinse lightly and pat dry, then reseason after baking.
- Over-torched edges? Shield with foil and lower oven temperature for a gentler finish.
- Splash with vinegar or lemon juice to brighten dull flavors and add zing.
Prep, store, and reheat tips
- You can slice the potatoes a few hours in advance, then keep them submerged in cold water in the fridge to prevent browning and starch buildup. Just drain and pat dry before baking for maximum crispness.
- Store baked chips in an airtight container at room temperature for up to 2 days. They’ll stay crispy if kept dry, but expect some slight softening over time.
- For longer storage, freeze cooled chips in a sealed bag for up to a month. Reheat in a 180°C (350°F) oven for 3-5 minutes, until they shimmer with renewed crunch and smell toasted.
- Reheated chips won’t be quite as crisp as fresh, but a quick blast in the oven or toaster oven will restore some snap. Watch them carefully to avoid burning, especially the edges.
Top questions about baked potato chips
1. How thin should I slice the potatoes?
Use very thin, even slices for maximum crispness. A mandoline makes it easier to get uniform thickness, which is key to crispy chips.
2. Do I need to dry the potato slices thoroughly?
Pat the slices completely dry after rinsing. Moisture is the biggest enemy of crispiness and will make the chips soggy instead of crunchy.
3. What temperature and how long should I bake them?
Bake at 200°C (390°F) for 15-20 minutes, flipping halfway. Keep an eye on the edges—they should turn deep golden, not burnt.
4. Can I skip the oil or use less?
Use a light spray of olive oil—about 2-3 sprays per batch. Too much oil will make them greasy and less crispy.
5. What seasonings work best?
Yes, you can add spices like paprika, garlic powder, or cayenne before baking. Sprinkle sparingly to prevent burning and enhance flavor.

6. How should I store baked chips and how long do they last?
Store cooled chips in an airtight container at room temperature for up to 2 days. For longer storage, freeze and reheat in the oven to restore crunch.
7. What if my chips turn out soggy?
If chips are soggy, re-bake at 180°C (350°F) for a few minutes, or add a light spray of oil and return to the oven.
8. How do I prevent burning?
Overcooking leads to burnt edges. Keep an eye on the color and remove chips as soon as they’re golden and smell toasted.
9. Should I flip the chips during baking?
Flipping the chips halfway through baking ensures even crispness and color. Use tongs or a spatula for gentle turning.
10. Can I add herbs or spices after baking?
For a more intense flavor, add herbs like rosemary or thyme after baking so they don’t burn and lose aroma.
These baked potato chips are a little nostalgic, a lot satisfying, and surprisingly easy to make. They remind me that simple ingredients, treated carefully, can turn into something special. Plus, they taste just enough like that crunch from childhood but with a healthier, homemade touch.
Whenever I bake a batch, I always think about how comforting it is to have control—over salt, seasonings, and oil. It’s one of those snacks that just feels right, especially when you want that crispy, salty bite without the guilt. And honestly, they’re perfect for sharing—or not.